今回はReact.jsを勉強したい初学者が、この記事を読めば簡単にアプリケーションの作成とテンプレートなレイアウトが作れるようになるまで導いていきたいと思います。
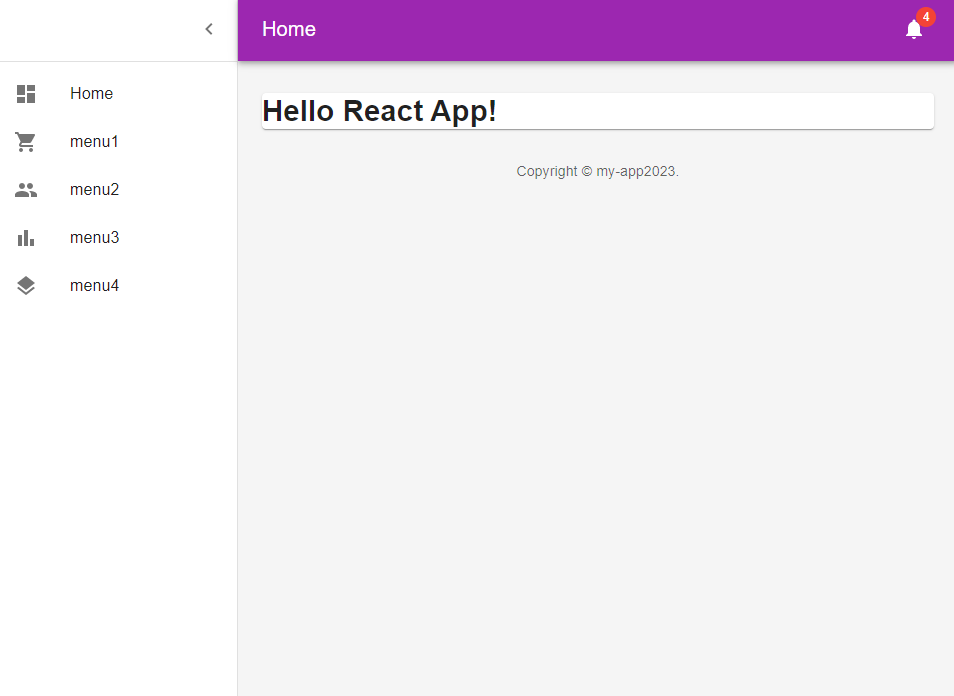
最終的に以下のようなレイアウトのアプリが作成ができるようになります。
目次
環境構築
先に今回使用するライブラリのバージョンや依存関係を紹介します。
途中で環境構築に失敗した方は以下を参考ください。
|
1 2 3 4 5 6 7 8 9 10 11 12 13 14 15 16 17 18 19 20 21 22 23 24 25 26 27 28 29 30 31 32 33 34 35 36 37 38 39 40 41 42 43 44 45 46 47 48 49 |
{ "name": "my-app", "version": "0.1.0", "private": true, "dependencies": { "@emotion/react": "^11.11.0", "@emotion/styled": "^11.11.0", "@mui/icons-material": "^5.11.16", "@mui/material": "^5.13.3", "@mui/styled-engine": "^5.13.2", "@testing-library/jest-dom": "^5.16.5", "@testing-library/react": "^13.4.0", "@testing-library/user-event": "^13.5.0", "@types/jest": "^27.5.2", "@types/node": "^16.18.34", "@types/react": "^18.2.7", "@types/react-dom": "^18.2.4", "react": "^18.2.0", "react-dom": "^18.2.0", "react-router-dom": "^6.11.2", "react-scripts": "5.0.1", "typescript": "^4.9.5", "web-vitals": "^2.1.4" }, "scripts": { "start": "react-scripts start", "build": "react-scripts build", "test": "react-scripts test", "eject": "react-scripts eject" }, "eslintConfig": { "extends": [ "react-app", "react-app/jest" ] }, "browserslist": { "production": [ ">0.2%", "not dead", "not op_mini all" ], "development": [ "last 1 chrome version", "last 1 firefox version", "last 1 safari version" ] } } |
では、環境構築について説明していきます。
Node.jsのインストールがまだの人は下記リンクからNode.jsをインストールしてください。
$ node -v
でバージョンが表示されればOKです。
次に、Reactアプリ作るコマンドを打ちます。
|
1 |
$ npx create-react-app my-app --template typescript |
今回は、TypeScriptのコマンドを打ちました。
TypeScriptを使用しない場合「–template typescript」を入れずにコマンドを打つとReactアプリが立ち上がります。
my-appのところはディレクトリ名なので好きに命名して大丈夫です。
|
1 2 |
$ cd my-app $ npm start |
とコマンドを打ってWebブラウザが立ち上がり、localhostで以下のサンプルページが表示されればOKです。

Material-UIを使おう
Material-UIは、Reactアプリケーションで美しく設計されたUIを構築するためのオープンソースのUIコンポーネントライブラリです。
Reactプロジェクトでは、ほぼ必須とも言えるUIライブラリーなので是非使い方を覚えましょう。
導入は簡単です。
|
1 2 |
$ npm install @mui/material @mui/icons-material $ npm install @mui/styled-engine @emotion/styled @emotion/react |
@emotion/reactは、Reactプロジェクトで使用されるCSS-in-JSライブラリの1つです。
CSS-in-JSは、JavaScriptコード内でスタイルを定義し、Cssファイルを作成することなくすべてのコードをJsで作成できるようになるので一緒にインストールしておきましょう。
さて、Material-UIですが、公式によってサンプルコードが公開されています。
例えば、ダッシュボードのサンプルコードはこちらから見ることができます。
サンプルコードから学べることは多いので目を通しておくことをおすすめします。
Layoutコンポーネントを作成
自分のアプリケーションの標準レイアウトを作成しましょう。
世の中には様々なアプリケーションがありますが、画面遷移したら全然違うレイアウトになることはほとんどありません。
多くの場合で、ヘッダー、フッター、サイドメニュー等共通のレイアウトなはずです。
共通のレイアウトの実装を目指します。
先に完成形をお見せします。
|
1 2 3 4 5 6 7 8 9 10 11 12 13 14 15 16 17 18 19 20 21 22 23 24 25 26 27 28 29 30 31 32 33 34 35 36 37 38 39 40 41 42 43 44 45 46 47 48 49 50 51 52 53 54 55 56 57 58 59 60 61 62 63 64 65 66 67 68 69 70 71 72 73 74 75 76 77 78 79 80 81 82 83 84 85 86 87 88 89 90 91 92 93 94 95 96 97 98 99 100 101 102 103 104 105 106 107 108 109 110 111 112 113 114 115 116 117 118 119 120 121 122 123 124 125 126 127 128 129 130 131 132 133 134 135 136 137 138 139 140 141 142 143 144 145 146 147 148 149 150 151 152 153 154 155 156 157 158 159 160 161 162 163 164 165 |
import * as React from 'react'; import { styled, ThemeProvider } from '@mui/material/styles'; import CssBaseline from '@mui/material/CssBaseline'; import MuiDrawer from '@mui/material/Drawer'; import Box from '@mui/material/Box'; import MuiAppBar, { AppBarProps as MuiAppBarProps } from '@mui/material/AppBar'; import Toolbar from '@mui/material/Toolbar'; import Typography from '@mui/material/Typography'; import Divider from '@mui/material/Divider'; import IconButton from '@mui/material/IconButton'; import Badge from '@mui/material/Badge'; import Container from '@mui/material/Container'; import MenuIcon from '@mui/icons-material/Menu'; import ChevronLeftIcon from '@mui/icons-material/ChevronLeft'; import NotificationsIcon from '@mui/icons-material/Notifications'; import theme from '../../style/theme'; import SideMenu from './SideMenu'; const drawerWidth: number = 240; interface AppBarProps extends MuiAppBarProps { open?: boolean; } const AppBar = styled(MuiAppBar, { shouldForwardProp: (prop) => prop !== 'open', })<AppBarProps>(({ theme, open }) => ({ zIndex: theme.zIndex.drawer + 1, transition: theme.transitions.create(['width', 'margin'], { easing: theme.transitions.easing.sharp, duration: theme.transitions.duration.leavingScreen, }), ...(open && { marginLeft: drawerWidth, width: `calc(100% - ${drawerWidth}px)`, transition: theme.transitions.create(['width', 'margin'], { easing: theme.transitions.easing.sharp, duration: theme.transitions.duration.enteringScreen, }), }), })); const Drawer = styled(MuiDrawer, { shouldForwardProp: (prop) => prop !== 'open' })( ({ theme, open }) => ({ '& .MuiDrawer-paper': { position: 'relative', whiteSpace: 'nowrap', width: drawerWidth, transition: theme.transitions.create('width', { easing: theme.transitions.easing.sharp, duration: theme.transitions.duration.enteringScreen, }), boxSizing: 'border-box', ...(!open && { overflowX: 'hidden', transition: theme.transitions.create('width', { easing: theme.transitions.easing.sharp, duration: theme.transitions.duration.leavingScreen, }), width: theme.spacing(7), [theme.breakpoints.up('sm')]: { width: theme.spacing(9), }, }), }, }), ); type LayoutProps = { title: string; children: React.ReactNode; }; const Layout: React.FC<LayoutProps> = ({title, children}) => { // サイドメニュー開閉状態 const [open, setOpen] = React.useState(true); // サイドメニュー開閉処理 const toggleDrawer = () => { setOpen(!open); }; return ( <ThemeProvider theme={theme}> <Box sx={{ display: 'flex' }}> <CssBaseline /> <AppBar position="absolute" open={open}>{/* ヘッダー部分の実装 */} <Toolbar sx={{ pr: '24px', // keep right padding when drawer closed }} > <IconButton edge="start" color="inherit" aria-label="open drawer" onClick={toggleDrawer} sx={{ marginRight: '36px', ...(open && { display: 'none' }), }} > <MenuIcon />{/* サイドメニューを開閉できるボタン */} </IconButton> <Typography component="h1" variant="h6" color="inherit" noWrap sx={{ flexGrow: 1 }} > {title} </Typography> <IconButton color="inherit"> <Badge badgeContent={4} color="secondary"> <NotificationsIcon />{/* 通知ボタン */} </Badge> </IconButton> </Toolbar> </AppBar> <Drawer variant="permanent" open={open}> <Toolbar sx={{ display: 'flex', alignItems: 'center', justifyContent: 'flex-end', px: [1], }} > <IconButton onClick={toggleDrawer}> <ChevronLeftIcon />{/* サイドメニューを開閉できるボタン */} </IconButton> </Toolbar> <Divider /> <SideMenu /> {/* サイドメニュー */} </Drawer> <Box component="main" sx={{ backgroundColor: (theme) => theme.palette.mode === 'light' ? theme.palette.grey[100] : theme.palette.grey[900], flexGrow: 1, height: '100vh', overflow: 'auto', }} > <Toolbar /> <Container maxWidth="lg" sx={{ mt: 4, mb: 4 }}> {children} <Box mt={4}> <Typography variant="body2" color="text.secondary" align="center" > {'Copyright © my-app'} {new Date().getFullYear()} {'.'} </Typography> </Box> </Container> </Box> </Box> </ThemeProvider> ); }; export default Layout; |
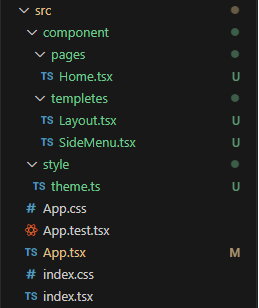
ファイル構成としては「src/component/templetes/Layout.tsx」に収納します。
今回作成するディレクトリ構成については以下をご参考ください。
では、早速実装してみましょう。
まずは以下をLayoutコンポーネントとして作成してください。
|
1 2 3 4 5 6 7 8 9 10 11 12 13 14 15 |
import React from 'react'; type LayoutProps = { children: React.ReactNode } const Layout: React.FC<LayoutProps> = ({ children }) => { return ( <> {children} </> ) }; export default Layout; |
先にサイドメニューコンポーネントとthemeコンポーネントを作成する必要があるのでひとまずここまでで大丈夫です。
次に移りましょう。
自分だけのアプリケーションテーマを作成しよう
一般的なアプリケーションでは、アプリケーション全体で均一なスタイルを維持するために、テーマを設定することが重要です。
Material-UIを用いて実装してみましょう。
「src/style/theme.ts」にてテーマを定義しましょう。
https://mui.com/material-ui/customization/color/を参考に実装しましょう。
|
1 2 3 4 5 6 7 8 9 10 11 12 13 |
import { createTheme } from '@mui/material/styles'; import { purple, red } from '@mui/material/colors'; const theme = createTheme({ palette: { primary: { main: purple[500], }, secondary: { main: red[500], }, }, }); |
このように記述するだけでテーマカラーを設定できました。
また、typographyオブジェクト内では、テキストのスタイルを指定することができます。
|
1 2 3 4 5 6 7 8 9 10 11 12 13 14 15 16 17 18 19 20 21 |
import { createTheme, responsiveFontSizes } from '@mui/material/styles'; import { purple, red } from '@mui/material/colors'; const theme = createTheme({ palette: { primary: { main: purple[500], }, secondary: { main: red[500], }, }, typography: { h4: { fontSize: '2rem', fontWeight: 600, }, }, }); export default responsiveFontSizes(theme); |
例としてh4について指定しました。
その他のコンポーネントに対してもカスタマイズができるのでこちらからご確認ください。
ちなみにテーマを自分で指定しないとこのようなスタイルになります。
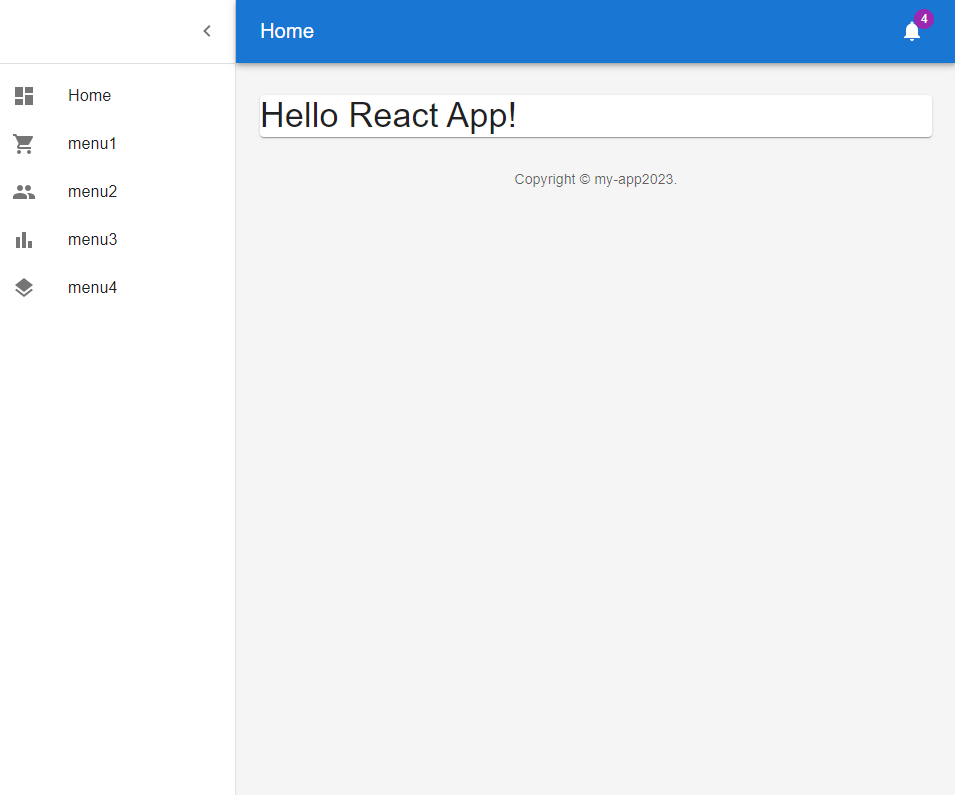
最初お見せした完成形との差分がわかるかと思います。
サイドメニューを作成しよう
続いてアプリケーション内の画面遷移ができるサイドメニューを作ります。
先程のサンプルコードのlistItemsを参考にサイドメニューを作成していきます。
Listコンポーネントについてはこちらからご確認ください。
ファイル構成としては「src/component/templetes/SideMenu.tsx」に収納します。
|
1 2 3 4 5 6 7 8 9 10 11 12 13 14 15 16 17 18 19 20 21 22 23 24 25 26 27 28 29 30 31 32 33 34 35 36 37 38 39 40 41 42 43 44 45 46 47 48 49 50 51 52 |
import * as React from 'react'; import List from '@mui/material/List' import ListItemButton from '@mui/material/ListItemButton'; import ListItemIcon from '@mui/material/ListItemIcon'; import ListItemText from '@mui/material/ListItemText'; import DashboardIcon from '@mui/icons-material/Dashboard'; import ShoppingCartIcon from '@mui/icons-material/ShoppingCart'; import PeopleIcon from '@mui/icons-material/People'; import BarChartIcon from '@mui/icons-material/BarChart'; import LayersIcon from '@mui/icons-material/Layers'; const SideMenu: React.FC = () => { return ( <> <List component="nav"> <ListItemButton component="a" href="/"> <ListItemIcon> <DashboardIcon /> </ListItemIcon> <ListItemText primary="Home" /> </ListItemButton> <ListItemButton> <ListItemIcon> <ShoppingCartIcon /> </ListItemIcon> <ListItemText primary="menu1" /> </ListItemButton> <ListItemButton> <ListItemIcon> <PeopleIcon /> </ListItemIcon> <ListItemText primary="menu2" /> </ListItemButton> <ListItemButton> <ListItemIcon> <BarChartIcon /> </ListItemIcon> <ListItemText primary="menu3" /> </ListItemButton> <ListItemButton> <ListItemIcon> <LayersIcon /> </ListItemIcon> <ListItemText primary="menu4" /> </ListItemButton> </List> </> ); }; export default SideMenu; |
とするとサイドメニューのアイコンをクリックしたとき画面遷移ができるサイドメニューを作成することができます。
Layoutコンポーネントを編集しよう。
さて、先程のサンプルコードを参考にLayout.tsxを完成させていきます。
|
1 2 3 4 5 6 7 8 9 10 11 12 13 14 15 16 17 18 19 20 21 22 23 24 25 26 27 28 29 30 31 32 33 34 35 36 37 38 39 40 41 42 43 44 45 46 47 48 49 50 51 52 53 54 55 56 57 58 59 60 61 62 63 64 65 66 67 68 69 70 71 72 73 74 75 76 77 78 79 80 81 82 83 84 85 86 87 88 89 90 91 92 93 94 95 96 97 98 99 100 101 102 103 104 105 106 107 108 109 110 111 112 113 114 115 116 117 118 119 120 121 122 123 124 125 126 127 128 129 130 131 132 133 134 135 136 137 138 139 140 141 142 143 144 145 146 147 148 149 150 151 152 153 154 155 156 157 158 159 160 161 162 163 164 165 |
import * as React from 'react'; import { styled, ThemeProvider } from '@mui/material/styles'; import CssBaseline from '@mui/material/CssBaseline'; import MuiDrawer from '@mui/material/Drawer'; import Box from '@mui/material/Box'; import MuiAppBar, { AppBarProps as MuiAppBarProps } from '@mui/material/AppBar'; import Toolbar from '@mui/material/Toolbar'; import Typography from '@mui/material/Typography'; import Divider from '@mui/material/Divider'; import IconButton from '@mui/material/IconButton'; import Badge from '@mui/material/Badge'; import Container from '@mui/material/Container'; import MenuIcon from '@mui/icons-material/Menu'; import ChevronLeftIcon from '@mui/icons-material/ChevronLeft'; import NotificationsIcon from '@mui/icons-material/Notifications'; import theme from '../../style/theme'; import SideMenu from './SideMenu'; const drawerWidth: number = 240; interface AppBarProps extends MuiAppBarProps { open?: boolean; } const AppBar = styled(MuiAppBar, { shouldForwardProp: (prop) => prop !== 'open', })<AppBarProps>(({ theme, open }) => ({ zIndex: theme.zIndex.drawer + 1, transition: theme.transitions.create(['width', 'margin'], { easing: theme.transitions.easing.sharp, duration: theme.transitions.duration.leavingScreen, }), ...(open && { marginLeft: drawerWidth, width: `calc(100% - ${drawerWidth}px)`, transition: theme.transitions.create(['width', 'margin'], { easing: theme.transitions.easing.sharp, duration: theme.transitions.duration.enteringScreen, }), }), })); const Drawer = styled(MuiDrawer, { shouldForwardProp: (prop) => prop !== 'open' })( ({ theme, open }) => ({ '& .MuiDrawer-paper': { position: 'relative', whiteSpace: 'nowrap', width: drawerWidth, transition: theme.transitions.create('width', { easing: theme.transitions.easing.sharp, duration: theme.transitions.duration.enteringScreen, }), boxSizing: 'border-box', ...(!open && { overflowX: 'hidden', transition: theme.transitions.create('width', { easing: theme.transitions.easing.sharp, duration: theme.transitions.duration.leavingScreen, }), width: theme.spacing(7), [theme.breakpoints.up('sm')]: { width: theme.spacing(9), }, }), }, }), ); type LayoutProps = { title: string; children: React.ReactNode; }; const Layout: React.FC<LayoutProps> = ({title, children}) => { // サイドメニュー開閉状態 const [open, setOpen] = React.useState(true); // サイドメニュー開閉処理 const toggleDrawer = () => { setOpen(!open); }; return ( <ThemeProvider theme={theme}> <Box sx={{ display: 'flex' }}> <CssBaseline /> <AppBar position="absolute" open={open}>{/* ヘッダー部分の実装 */} <Toolbar sx={{ pr: '24px', // keep right padding when drawer closed }} > <IconButton edge="start" color="inherit" aria-label="open drawer" onClick={toggleDrawer} sx={{ marginRight: '36px', ...(open && { display: 'none' }), }} > <MenuIcon />{/* サイドメニューを開閉できるボタン */} </IconButton> <Typography component="h1" variant="h6" color="inherit" noWrap sx={{ flexGrow: 1 }} > {title} </Typography> <IconButton color="inherit"> <Badge badgeContent={4} color="secondary"> <NotificationsIcon />{/* 通知ボタン */} </Badge> </IconButton> </Toolbar> </AppBar> <Drawer variant="permanent" open={open}> <Toolbar sx={{ display: 'flex', alignItems: 'center', justifyContent: 'flex-end', px: [1], }} > <IconButton onClick={toggleDrawer}> <ChevronLeftIcon />{/* サイドメニューを開閉できるボタン */} </IconButton> </Toolbar> <Divider /> <SideMenu /> {/* サイドメニュー */} </Drawer> <Box component="main" sx={{ backgroundColor: (theme) => theme.palette.mode === 'light' ? theme.palette.grey[100] : theme.palette.grey[900], flexGrow: 1, height: '100vh', overflow: 'auto', }} > <Toolbar /> <Container maxWidth="lg" sx={{ mt: 4, mb: 4 }}> {children} <Box mt={4}> <Typography variant="body2" color="text.secondary" align="center" > {'Copyright © my-app'} {new Date().getFullYear()} {'.'} </Typography> </Box> </Container> </Box> </Box> </ThemeProvider> ); }; export default Layout; |
こうするとタイトルと子コンポーネントを反映できる標準レイアウトを作成することができます。
通知ボタンについては、余力があれば作り込んでみてください。
では、早速Layoutコンポーネントを活用してみましょう。
Layoutコンポーネントを活用しよう
では、「component/pages/Home」ファイルにて作成したLayoutコンポーネントを活用してみます。
|
1 2 3 4 5 6 7 8 9 10 11 12 13 14 15 |
import React from "react"; import Layout from "../templates/Layout"; import { Paper, Typography } from "@mui/material"; const Home = () => { return( <Layout title="Home"> <Paper > <Typography>Hello React App!</Typography> </Paper> </Layout> ) }; export default Home; |
先程のLayoutコンポーネントを用いてタイトルがHomeのページを作成することができました。
続いてApp.tsも編集していきます。
まず、ページ遷移にはreact-router-domを用います。
詳しくはこちらから
|
1 |
$ npm i react-router-dom |
インストールができたら準備OKです。
|
1 2 3 4 5 6 7 8 9 10 11 12 13 14 |
import React from 'react'; import {BrowserRouter, Routes, Route} from 'react-router-dom'; import Home from './component/pages/Home'; export default function App() { return ( <BrowserRouter> <Routes> <Route path='/' element={<Home />} /> </Routes> </BrowserRouter> ); } |
こうすることにより、pathが’/’のときHomeコンポーネントを描画するように設定できます。
リンクを増やしたい場合、
|
1 |
<Route path='/menu1' element={<Menu1 />} /> |
などを挿入してあげると追加することができます。
これで完成です。
|
1 |
$ npm start |
とコマンドを打って、完成を見てみましょう!

このようになりました。
今風なレイアウトになったんじゃないでしょうか?
みなさんも是非試してみてください。
- 【Kiro・Playwright】社内でフルAI開発バトル!!「1行も書かずに」Todoアプリを完成させた話〜matsuraの場合〜 - 2025-12-03
- Next.jsアプリケーションをAWS App Runnerにデプロイする実践ガイド - 2025-04-07
- 去年1年間で最も勢いのあったJavaScriptライブラリを見ていく【JavaScript Rising Stars 2024】 - 2025-01-09
- Next.jsでAmazon Connectの標準CCPを埋め込み動的データを取得する方法 - 2025-01-06
- Twilio Flex v2.x.x系でLINE連携を実装する方法 - 2024-12-23
【採用情報】一緒に働く仲間を募集しています

