こんにちは!エンジニアの君島です。
AWS CloudShellは、AWS マネジメントコンソールから実行可能なShellです。1 GB の永続ストレージがあるのが特徴のひとつであるため、ディスク容量を考慮する必要があります。
また、Rustは非常に高速でメモリ効率が高いプログラミング言語としてよく知られています。Rustで書かれたコマンドには色々な種類のものがあります。
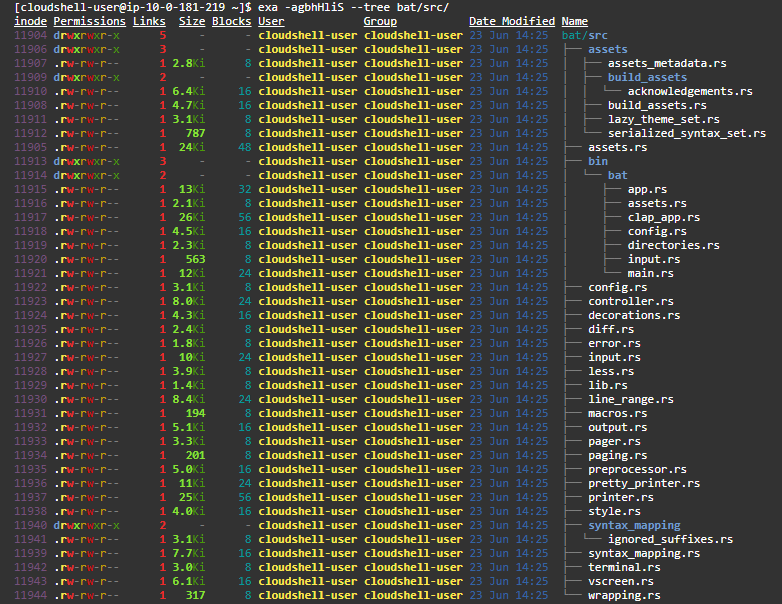
exaはlsコマンドの代替のひとつとして、よく知られているコマンドです。以下のようにツリーや色彩表示など様々な表現ができることで知られています。
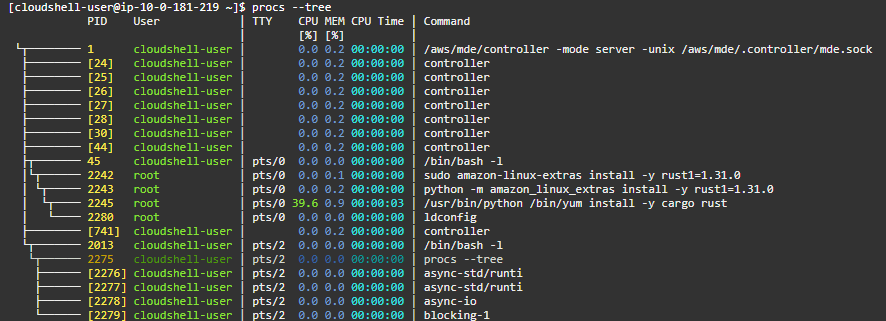
procsはpsコマンドの代替のひとつです。人が見て見やすいと感じるカラフルな出力をしてくれます。
他にもcrates.ioというリポジトリに色々なRust製のコマンドがあるので、よければ参照してください。
AWS CloudShellでも表現豊かなコマンドを実行してみたくなりまして、いくつかのRust製のコマンドをインストールして実行できるようにしてみました。
目次
Rustのインストール
rustupのインストーラーを用いる
rustupを用いたインストールRustとしての推奨は、rustupを使ったインストールのようです。以下のコマンドを実行してみましょう。
|
1 |
$ curl https://sh.rustup.rs/ -sSf | sh |
ただ、defaultのままの設定でインストールスクリプトを実行してみたところ、以下のように出力されてしまいました。 rustup経由のインストールでは、/home/cloudshell-user/.rustupにファイルを生成するため、1GBの/homeでは容量が不足してしまうようです。
|
1 |
error: failed to extract package (perhaps you ran out of disk space?): No space left on device (os error 28) |
もう少しrustupで粘ってみます。フルインストールするからディスク容量が足りなくなるので、今度は設定をカスタマイズしてインストールしてみましょう。再度インストールのコマンドを実行します。
|
1 2 3 4 5 6 7 8 9 10 11 12 13 14 15 16 17 18 19 20 21 22 23 24 25 26 27 28 29 30 31 32 33 34 35 36 37 38 39 40 41 42 43 44 45 46 47 48 49 50 51 52 53 54 55 56 57 58 59 60 61 62 63 64 65 66 67 68 69 70 71 72 73 74 75 76 77 78 79 80 81 82 83 84 85 86 87 88 89 90 91 92 93 94 95 96 97 |
$ curl <https://sh.rustup.rs/> -sSf | sh info: downloading installer Welcome to Rust! This will download and install the official compiler for the Rust programming language, and its package manager, Cargo. Rustup metadata and toolchains will be installed into the Rustup home directory, located at: /home/cloudshell-user/.rustup This can be modified with the RUSTUP_HOME environment variable. The Cargo home directory located at: /home/cloudshell-user/.cargo This can be modified with the CARGO_HOME environment variable. The cargo, rustc, rustup and other commands will be added to Cargo's bin directory, located at: /home/cloudshell-user/.cargo/bin This path will then be added to your PATH environment variable by modifying the profile files located at: /home/cloudshell-user/.profile /home/cloudshell-user/.bash_profile /home/cloudshell-user/.bashrc /home/cloudshell-user/.zshenv You can uninstall at any time with rustup self uninstall and these changes will be reverted. Current installation options: default host triple: x86_64-unknown-linux-gnu default toolchain: stable (default) profile: default modify PATH variable: yes 1) Proceed with installation (default) 2) Customize installation 3) Cancel installation >2 <-- 設定をカスタマイズしましょう I'm going to ask you the value of each of these installation options. You may simply press the Enter key to leave unchanged. Default host triple? [x86_64-unknown-linux-gnu] <-- デフォルトのまま何も入力しないでEnter Default toolchain? (stable/beta/nightly/none) [stable] <-- デフォルトのまま何も入力しないでEnter Profile (which tools and data to install)? (minimal/default/complete) [default] minimal <-- minimalを入力してEnter Modify PATH variable? (Y/n) <-- デフォルトのまま何も入力しないでEnter Current installation options: default host triple: x86_64-unknown-linux-gnu default toolchain: stable profile: minimal modify PATH variable: yes 1) Proceed with installation (default) 2) Customize installation 3) Cancel installation > <-- 何も入力しないでEnterでインストール実行 info: profile set to 'minimal' info: setting default host triple to x86_64-unknown-linux-gnu info: syncing channel updates for 'stable-x86_64-unknown-linux-gnu' info: latest update on 2022-05-19, rust version 1.61.0 (fe5b13d68 2022-05-18) info: downloading component 'cargo' info: downloading component 'rust-std' info: downloading component 'rustc' info: installing component 'cargo' info: installing component 'rust-std' 26.9 MiB / 26.9 MiB (100 %) 10.7 MiB/s in 2s ETA: 0s info: installing component 'rustc' 55.4 MiB / 55.4 MiB (100 %) 10.8 MiB/s in 5s ETA: 0s info: default toolchain set to 'stable-x86_64-unknown-linux-gnu' stable-x86_64-unknown-linux-gnu installed - rustc 1.61.0 (fe5b13d68 2022-05-18) Rust is installed now. Great! To get started you may need to restart your current shell. This would reload your PATH environment variable to include Cargo's bin directory ($HOME/.cargo/bin). To configure your current shell, run: source $HOME/.cargo/env |
Rustのインストールに成功しました。さて、ここでディスク容量を確認してみましょう。
|
1 2 3 4 5 6 7 8 9 10 |
$ df Filesystem 1K-blocks Used Available Use% Mounted on overlay 30832548 10234216 19009084 35% / tmpfs 65536 0 65536 0% /dev shm 1896332 0 1896332 0% /dev/shm tmpfs 1896332 0 1896332 0% /sys/fs/cgroup /dev/nvme1n1 30832548 10234216 19009084 35% /aws/mde /dev/loop0 999320 497536 432972 54% /home tmpfs 1896332 0 1896332 0% /proc/acpi tmpfs 1896332 0 1896332 0% /sys/firmware |
まだ半分くらい余力がありますね。ですが、ここでネタバレしますと、cargo installでインストールした場合、バイナリクレートはルートのbinフォルダ、つまり/home/cloudshell-user/.cargo/bin以下に保持されます。いくつかのコマンドで試したところ、ディスク容量が足りなくなってしまったのでrustup経由でのインストールは諦めました。
amazon-linux-extrasを用いる
AWS CloudShellのOSはAmazon Linux2ですので、Extras Libraryが利用できます。また、RustはExtras Libraryの対象のトピックとなっていますので、amazon-linux-extrasコマンドを使ってRustをインストールしてみましょう。
|
1 |
sudo amazon-linux-extras install rust1=stable -y |
ただ、こうしてinstallした場合、rustcやcargoのオブジェクトは/home以下には保存されません。言い換えれば、インストールしたオブジェクトはセッションが切れてしまうと失われてしまうということです。とはいえ、Rust製のコマンド達はすでにビルドがなされている実行オブジェクトですので、rustcやcargoを必要としません。また必要になったら入れればよいという考えで、このようにしました。
exaのインストール
cargoを用いる
cargoを用いてインストールしていきます。exaはlibgit2に依存しています。ただ、必ずしもGitサポートの機能を使用しなくてもよい場合は、–no-default-featuresオプションを指定すればインストールに成功します。
|
1 2 3 4 5 6 7 8 9 10 11 12 13 14 15 16 17 18 19 20 21 22 23 24 25 26 |
$ cargo install --no-default-features exa Updating crates.io index Installing exa v0.10.1 Compiling libc v0.2.126 Compiling unicode-width v0.1.9 Compiling log v0.4.17 Compiling cfg-if v1.0.0 Compiling byteorder v1.4.3 Compiling number_prefix v0.4.0 Compiling lazy_static v1.4.0 Compiling scoped_threadpool v0.1.9 Compiling glob v0.3.0 Compiling ansi_term v0.12.1 Compiling natord v1.0.9 Compiling pad v0.1.6 Compiling term_grid v0.1.7 Compiling locale v0.2.2 Compiling users v0.11.0 Compiling num_cpus v1.13.1 Compiling term_size v0.3.2 Compiling datetime v0.5.2 Compiling zoneinfo_compiled v0.5.1 Compiling exa v0.10.1 Finished release [optimized] target(s) in 57.43s Installing /home/cloudshell-user/.cargo/bin/exa Installed package `exa v0.10.1` (executable `exa`) |
配布されているバイナリを用いる
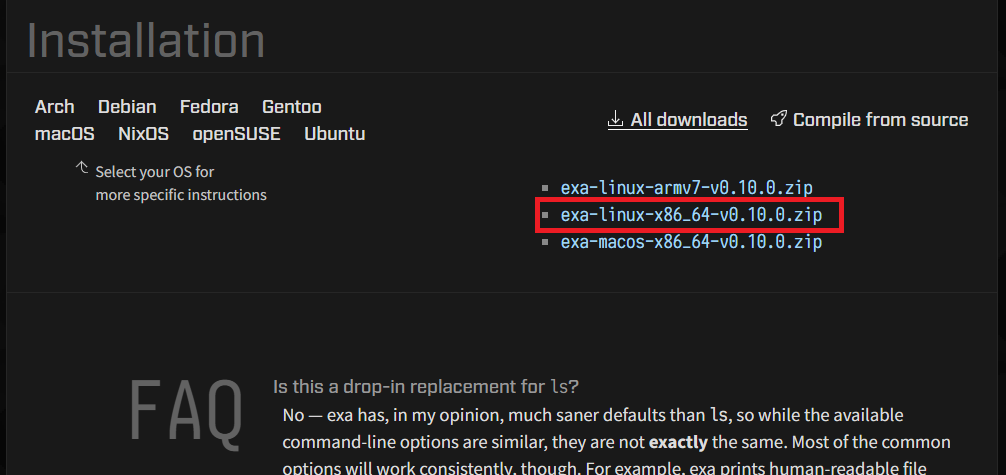
実はバイナリが配布されていましたので、単にバイナリを配置してしまいましょう。コチラから、以下画像の赤枠のバイナリをダウンロードします。zipを解凍するとexaのバイナリが取得できます。
AWS CloudShellにexaのバイナリをアップロードしましょう。Actions > Upload fileを選択して、exaを指定してアップロードしてください。

アップロードしたexaのバイナリは、/home/cloudshell-user配下にアップロードされます。

exaのバイナリをパスが通っている場所、今回は他のRustがインストールされている前提にて、他のコマンドと同じ場所に配置して、実行権限を付与しておきます。
|
1 2 |
$ mv exa .cargo/bin/ $ chmod 755 .cargo/bin/exa |
お好きな方法でインストールしてみてください。以上で、exaのインストールは完了です。
procsのインストール
rpmを用いる
procsのリポジトリはコチラです。
rpmでのインストールもありました。cargo要りませんでした。procsのrpmは再配置不可なパッケージだったので、オプション指定で/home以下のパスを指定して配置するようにしました。
|
1 2 |
$ sudo rpm -iv --relocate /usr/bin/procs=/home/cloudshell-user/.cargo/bin/procs \ --badreloc https://github.com/dalance/procs/releases/download/v0.12.3/procs-0.12.3-1.x86_64.rpm |
procsを実行
procsを実行してみましょう。人が見やすいような色彩で表示もできますし、ツリー表示のような出力もできます。
batのインストール
cargoを用いる(失敗)
リポジトリはコチラです。
何も考えずにcargo installしてみましたが、ダメでした。
|
1 2 3 4 5 6 7 8 9 10 11 12 13 14 15 16 17 18 19 20 21 22 23 24 25 26 27 28 29 |
$ cargo install bat Updating crates.io index Downloaded bat v0.21.0 Downloaded 1 crate (1.6 MB) in 0.81s Installing bat v0.21.0 Downloaded ansi_colours v1.1.1 Downloaded bytesize v1.1.0 Downloaded atty v0.2.14 Downloaded walkdir v2.3.2 Downloaded onig_sys v69.7.1 Downloaded std_prelude v0.2.12 Downloaded thiserror-impl v1.0.31 Downloaded wild v2.0.4 Downloaded xml-rs v0.8.4 Downloaded yaml-rust v0.4.5 Downloaded thiserror v1.0.31 Downloaded serde_derive v1.0.137 Downloaded once_cell v1.12.0 Downloaded indexmap v1.9.1 error: failed to compile `bat v0.21.0`, intermediate artifacts can be found at `/tmp/cargo-installYrn62b` Caused by: failed to parse manifest at `/home/cloudshell-user/.cargo/registry/src/github.com-1ecc6299db9ec823/indexmap-1.9.1/Cargo.toml` Caused by: failed to parse the `edition` key Caused by: this version of Cargo is older than the `2021` edition, and only supports `2015` and `2018` editions. |
確認したところ、現在のExtras LibraryでRustのStableは1.47.0のようでしたが、batはどうやら2015か2018(1.31.0)をサポートしているようです。
|
1 2 |
$ cargo -V cargo 1.47.0 |
一方でbatをソースからビルドするにはRust1.51.0以降である必要があるようです。
If you want to build
batfrom source, you need Rust 1.51 or higher.
そこで、最新のbatをインストールすることは諦めて、ソースからビルドすることにしました。
ソースからビルドしてインストール
ソースをGithubからクローンして、ビルドするには1GBのストレージでは足りませんでした。ビルドに使用したソースは保存しておく必要もないので、永続しない場所に保存してしまいましょう。
また、RustのバージョンもStableから1.31.0に下げます。Extras Libraryを使用してRustをインストールしていたので、CloudShellのセッションが切れたら再度入れ直せばよいのが楽ですね。
|
1 |
sudo amazon-linux-extras install rust1=1.31.0 -y |
batはバージョン0.9.0であれば、Rust 1.31.0には対応していたことがコミットログから読み取れましたので、このバージョンを採用しました。ソースからビルドしてインストールしましょう。なお、前述の通りcargo installで保存されるオブジェクトのパスは実行ユーザのルートになってしまうので、ビルド対象のソースのパーミッションを事前に変更しています。
|
1 2 3 4 5 6 |
$ sudo git clone https://github.com/sharkdp/bat /aws/mde/git/bat $ sudo chown -R cloudshell-user. /aws/mde/git/bat $ cd /aws/mde/git/bat/ $ git checkout b68c5d857688201db44a188cbd89c93f9841ea7f $ cargo build --release <-- ビルドが完了するまで10分くらい待ってください。 $ cargo install --locked |
以上でbatのインストールは完了です。
batの実行
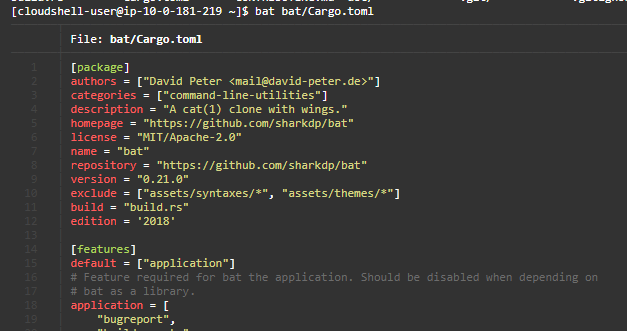
batはcatの代替コマンドです。以下のように行数や枠も表示されているのがわかります。
まとめ
AWS CloudShellにamazon-linux-extras経由でRustをインストールし、Rust製のコマンドをインストールしてみました。
バイナリが配布されているexaと、rpmでインストールできるprocsのようなコマンドはお手軽にインストールできました。
一方で、batは大変でした。実行環境のストレージ容量だけでなく、Extra LibraryでサポートしているRustのバージョンにも影響されるので、通常とは少し違ったクレートのインストールが求められることが分かりました。
カジュアル面談も実施中!
ギークフィードではAWSエンジニアを募集しています。
弊社に興味を持っていただいたり、会社のことをカジュアルに聞いてみたいという場合でも、ご気軽にフォームからお問い合わせください。その場合はコメント欄に、カジュアルにお話したいです、と記載ください!
- AWS Card Clashがマルチ対戦可能になっていたり進化していた - 2025-04-08
- 2ヶ月で全取得したAWS認定を2ヶ月以内に再認定&取得し直す - 2025-04-01
- オフィスにかかってきた電話の内容を生成AIにかませて議事録作成を自動化する - 2024-12-25
- AWS Partner Central API for Sellingを使うための準備と疎通確認してみた - 2024-12-25
- Amazon Bedrockでコード生成したスタンプラリーアプリをAWS Summit Japanで展示するまで - 2024-12-17
【採用情報】一緒に働く仲間を募集しています


