目次
はじめに
このブログはギークフィードアドベントカレンダー2023の15日目の記事です。
今回はAmplifyで生成したREST APIのAPI Gatewayに、Lambda Authorizerを作成しAPI Gatewayの認証に使用する方法をご紹介します。
構築する背景
構築することとなった背景をご紹介いたします。
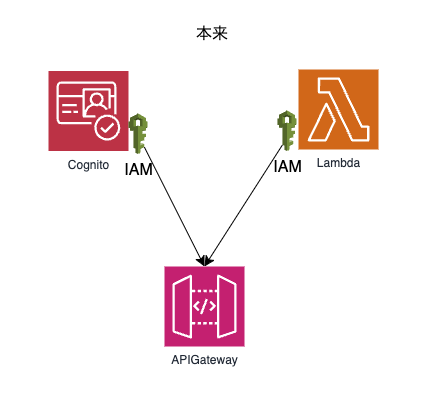
認可の方法ですが、①Cognito認証でのフロントからのリクエストと②IAMでのLambdaからのリクエスト二つをAPI Gatewayに設定する必要がありました。
本来であればCognitoのユーザーにIAMポリシーをアタッチする方法をとればIAM認証のみの設定で構築したいことの実現は可能です。

しかし今回は要件として、
・CognitoはAmplifyがデプロイされているAWSアカウントとは別のAWSアカウント上にありカスタマイズができない
という問題があり、API GatewayはCognito認証とIAM認証を同時に設定することができないためLambda Authorizerを構築しカスタム認可を設定する必要がありました。
以下は簡単な構成図です。

環境情報
Lambda:Node18
フロントアプリ:React17、Node16.15.1
Lambda オーソライザー (以前のカスタムオーソライザー) は、Lambda 関数を使用して API へのアクセスを制御する API Gateway の機能です。
(引用: API Gateway Lambda オーソライザーを使用する)
Lambda Authorizer には二種類あります。
- TokenベースのLambda Authorizer
- リクエストベースのLambda Authorizer
今回はTokenベースのLambda AuthorizerについてAmplifyが生成したAPI Gatewayにアタッチする方法と、Lambda内で受け取ったTokenを判別し認証を与える方法について解説していきます。
Amplify CLIでいつもLambdaを生成するように
|
1 2 |
amplify add function |
コマンドを使用しLambdaを作成します
今回はNode.jsを選びます。
テンプレートはHello Worldでいいです。
|
1 2 3 4 5 6 |
amplify add function ? Select which capability you want to add: Lambda function (serverless function) ? Provide an AWS Lambda function name: myLambdaAuthorizer ? Choose the runtime that you want to use: NodeJS ? Choose the function template that you want to use: Hello World |
こんな感じです。
Amplify CLIを使用して以下のコマンドを打ちます。
|
1 2 |
amplify override api |
設定したい選択肢を選ぶと「amplify/backend/api/{api名}/override.ts」が生成されます。
|
1 2 3 4 5 6 7 8 9 10 11 12 13 14 15 16 17 18 19 20 21 22 23 24 25 26 27 28 29 30 31 32 33 34 35 36 37 38 39 40 41 42 43 44 45 46 47 48 49 50 51 52 53 54 55 56 57 58 59 60 61 62 63 64 65 66 67 68 69 70 71 72 73 74 75 76 77 78 79 80 81 82 83 84 85 86 87 88 89 90 91 92 93 94 95 96 97 98 99 100 101 102 103 104 105 |
// This file is used to override the REST API resou // ⚠️ Lambda オーソライザー関数を作成するときに設定した関数名を入力してください // amplify/backend/function/<your-custom-authorizer-function-name> const customAuthorizerFunctionName = "myLambdaAuthorizer"; // see: <https://docs.amplify.aws/cli/restapi/override/> export function override(resources: AmplifyApiRestResourceStackTemplate) { const customAuthorizerFunctionArn = { "Fn::Join": [ "", [ "arn:aws:lambda:", { Ref: "AWS::Region", }, ":", { Ref: "AWS::AccountId", }, `:function:${customAuthorizerFunctionName}-`, { Ref: "env", }, ], ], }; resources.restApi.addPropertyOverride("Body.securityDefinitions", { MyLambdaAuthorizer: { type: "apiKey", name: "Authorization", in: "header", "x-amazon-apigateway-authtype": "custom", "x-amazon-apigateway-authorizer": { type: "token", authorizerUri: { "Fn::Join": [ "", [ "arn:aws:apigateway:", { Ref: "AWS::Region", }, ":lambda:path/2015-03-31/functions/", customAuthorizerFunctionArn, "/invocations", ], ], }, authorizerResultTtlInSeconds: 300, }, }, }); resources.addCfnResource( { type: "AWS::Lambda::Permission", properties: { FunctionName: customAuthorizerFunctionArn, Action: "lambda:InvokeFunction", Principal: "apigateway.amazonaws.com", SourceAccount: { Ref: "AWS::AccountId", }, SourceArn: { "Fn::Join": [ "", [ "arn:aws:execute-api:", { Ref: "AWS::Region", }, ":", { Ref: "AWS::AccountId", }, `:${resources.restApi.ref}/authorizers/*`, ], ], }, }, }, "ApiGatewayPermission" ); for (const path in resources.restApi.body.paths) { // Add the Authorization header as a parameter to requests resources.restApi.addPropertyOverride( `Body.paths.${path}.x-amazon-apigateway-any-method.parameters`, [ ...resources.restApi.body.paths[path]["x-amazon-apigateway-any-method"] .parameters, { name: "Authorization", in: "header", required: false, type: "string", }, ] ); // Use your new custom authorizer for security resources.restApi.addPropertyOverride( `Body.paths.${path}.x-amazon-apigateway-any-method.security`, [{ MyLambdaAuthorizer: [] }] ); } } |
これで設定できます。
では認可の中身を実装していきます。
冒頭でフロントからのCognito認証でのリクエストとLambdaからのIAM認証でのリクエストを同時にしたいと述べました。
送られてきたTokenがフロントからのリクエストかLambdaからのリクエストかまず判別しなければなりません。
今回私はフロントアプリケーションのCognitoトークンとLambdaからのIAM認証を以下のように分け識別できるようにいたしました。(セキュリティ上の観点から一部ブログ投稿用に変更を加えています。)
- フロントからのリクエスト
|
1 2 3 4 5 6 7 8 9 10 11 12 13 |
import { API, Auth } from "aws-amplify"; 〜〜〜〜〜〜〜〜〜〜〜〜〜〜〜〜〜〜〜〜〜〜〜〜〜〜〜〜〜〜〜〜 await API.post(${REST_API_NAME}, ${PATH}, { headers: { Authorization: `COGNITO_TOKEN ${(await Auth.currentSession()) .getIdToken() .getJwtToken()}`, }, body: { body } }); |
- Lambdaからのリクエスト
|
1 2 3 4 5 6 7 8 9 10 11 12 13 14 15 16 |
import AWS from "aws-sdk"; import axios from "axios"; 〜〜〜〜〜〜〜〜〜〜〜〜〜〜〜〜〜〜〜〜〜〜〜〜〜〜〜〜〜〜〜 const roleCreds = { accessKeyId: AWS.config.credentials.accessKeyId, secretAccessKey: AWS.config.credentials.secretAccessKey, sessionToken: AWS.config.credentials.sessionToken, }; axios.create({ baseURL: BASE_URL, headers: { Authorization: `LAMBDA_TOKEN ${JSON.stringify(roleCreds)}`, "Content-Type": "application/json", }, }); |
先ほど作成したLambda Authorizerでは以下のような処理で認可しています。
index.mjs
|
1 2 3 4 5 6 7 8 9 10 11 12 13 14 15 16 17 18 19 20 21 22 23 24 25 26 27 28 29 30 31 32 33 34 35 36 37 38 39 40 41 42 43 44 45 46 47 48 49 50 51 52 53 |
import { verifyIAMToken } from "./credentials/verifyIAMToken.mjs"; import { verifyCognitoToken } from "./credentials/verifyCognitoToken.mjs"; export const handler = async function (event, context, callback) { const token = event.authorizationToken; if (!token) { callback("Unauthorized"); // Return a 401 Unauthorized response } // token 検証 if (token.startsWith("LAMBDA_TOKEN")) { // IAMトークンとして識別 const { isVerify, principalId } = await verifyIAMToken( token.split("LAMBDA_TOKEN ")[1] ); console.log(isVerify, principalId); callback( null, generatePolicy(principalId, isVerify ? "Allow" : "Deny", event.methodArn) ); } else if(token..startsWith("COGNITO_TOKEN")) { // Cognitoトークンとして識別 const { isVerify, principalId } = await verifyCognitoToken( token.split("COGNITO_TOKEN ")[1] ); console.log(isVerify, principalId); callback( null, generatePolicy(principalId, isVerify ? "Allow" : "Deny", event.methodArn) ); } else { callback("Unauthorized"); // Return a 401 Unauthorized response } }; // Help function to generate an IAM policy const generatePolicy = (principalId, effect, resource) => { const authResponse = {}; authResponse.principalId = principalId; if (effect && resource) { const policyDocument = {}; policyDocument.Version = "2012-10-17"; policyDocument.Statement = []; const statementOne = {}; statementOne.Action = "execute-api:Invoke"; statementOne.Effect = effect; statementOne.Resource = `arn:aws:execute-api:${process.env.REGION}:${process.env.ACCOUNT_ID}:${process.env.REST_API_APIID}/${process.env.ENV}/*`; policyDocument.Statement[0] = statementOne; authResponse.policyDocument = policyDocument; } return authResponse; }; |
verifyCognitoToken.mjs
|
1 2 3 4 5 6 7 8 9 10 11 12 13 14 15 16 17 18 19 20 21 22 23 24 25 26 27 28 29 30 |
import { CognitoJwtVerifier } from "aws-jwt-verify"; // トークン検証 export const verifyCognitoToken = async (token) => { const verifier = CognitoJwtVerifier.create({ userPoolId: process.env.COGNITO_USER_POOL_ID, tokenUse: "id", clientId: process.env.COGNITO_CLIENT_ID, }); let isVerify; let principalId; try { // トークンを検証 const idTokenPayload = await verifier.verify(token); // トークン検証が成功した場合 isVerify = true; principalId = idTokenPayload.sub; } catch (err) { console.log(err); // トークン検証が失敗した場合 isVerify = false; principalId = null; } finally { return { isVerify: isVerify, principalId: principalId, }; } }; |
verifyIAMToken.mjs
|
1 2 3 4 5 6 7 8 9 10 11 12 13 14 15 16 17 18 19 20 21 22 23 24 25 26 27 28 29 30 31 32 33 34 35 |
import AWS from "aws-sdk"; import { isAllow } from "../util/index.mjs"; // トークン検証 export const verifyIAMToken = async (roleCreds) => { const token = JSON.parse(roleCreds); let isVerify; let principalId; const sts = new AWS.STS({ apiVersion: "2011-06-15", region: process.env.REGION, accessKeyId: token.accessKeyId, secretAccessKey: token.secretAccessKey, sessionToken: token.sessionToken, }); try { const user = await sts.getCallerIdentity().promise(); // isAllow関数で許可対象かどうかを判別 if (!isAllow(user)) { throw new Error("Requesr is not authenticate"); } isVerify = true; principalId = user.Arn; } catch (err) { console.log(err); isVerify = false; principalId = null; } finally { return { isVerify: isVerify, principalId: principalId, }; } }; |
これでCognitoトークンとIAMのSTS検証を行いセキュアにAPI Gatewayを構築することができました。
generatedPoricyのstatementOne.Resource については今回キャッシュの都合上ワイルドカードを使いました。詳しくはこちら
verifyCognitoToken.mjsの方はaws-jwt-verifyというライブラリを使用しトークンの検証を行い、verifyIAMToken.mjsの方はSTSのGetCallerIdentityを使用しトークンからIAMの判別を行うことでセキュリティを強固なものにしております。
また、今回は簡略化のために環境変数を使用していますが、SSMパラメータストアでシークレット環境変数の設定をするとよりセキュアに実装できると思います。
最後に
以上でAmplifyでAPI GatewayのLambda Authorizerを設定し認可を実装する方法の解説を終わります。
参考資料
Amplify の REST API に Lambda オーソライザーを設定する
- 【Kiro・Playwright】社内でフルAI開発バトル!!「1行も書かずに」Todoアプリを完成させた話〜matsuraの場合〜 - 2025-12-03
- Next.jsアプリケーションをAWS App Runnerにデプロイする実践ガイド - 2025-04-07
- 去年1年間で最も勢いのあったJavaScriptライブラリを見ていく【JavaScript Rising Stars 2024】 - 2025-01-09
- Next.jsでAmazon Connectの標準CCPを埋め込み動的データを取得する方法 - 2025-01-06
- Twilio Flex v2.x.x系でLINE連携を実装する方法 - 2024-12-23
【採用情報】一緒に働く仲間を募集しています


